DIY Book Trading Cards
My family traveled over the holidays and at one point, we saw a TSA agent with a K9 dog. Thing 2 pointed and said, “look, there’s a dog,” which prompted the TS-9 to hand her a trading card made about the dog, whose name was Hilbert. It was a genius marketing strategy to make kids comfortable and satisfy their curiosity while maintaining their distance and prevent them from approaching or petting the working dogs.

 I kept thinking about this K9 trading card and all the fun marketing potential it has. So the other day I tweeted and said, what if we made book trading cards? I liked the idea so much that I then started obsessively figuring out ways to make trading cards and exploring the best tools, as I have a tendency to do. Here’s a look at 5 tools I used, the trading cards I created using them, and then at the end of this post I have a few ideas for ways that we can use the idea of trading cards to promote reading, programs and libraries in school and public libraries.
ADVERTISEMENT
ADVERTISEMENT
Instax Mini Trading Cards
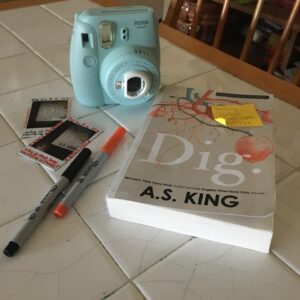
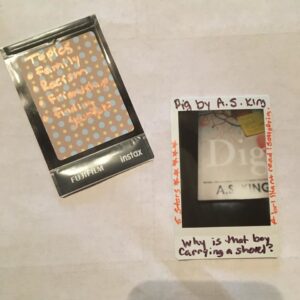
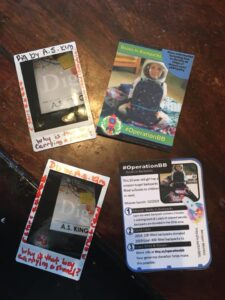
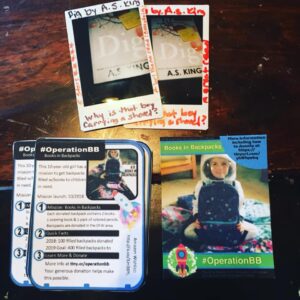
As regular readers know, I am recently obsessed with the Instax Mini camera. I like the wide variety of things you can do with it AND the fact that you get an instant picture. Patience is not a virtue I have and I don’t have a lot of art or tech skills. You can buy a variety of Instax Mini sticker frames, which have a piece that goes on the back of your photo, which helps make this project work. This back sticker makes it so that you can use both sides of the photograph to make quick and easy trading cards. Use a Sharpie marker (I found the Extra Fine tip worked the best) to write on the front and back of your instant photo. You can also use metallic silver Sharpies to write directly on the black back if you don’t have sticker frames. I wrote various facts and gave a rating for my book in the margins of the photo. Here I did an example using the upcoming book Dig by A. S. King.
The benefit to this method is that it is seriously quick and easy. The drawback, of course, is that you have to have a couple of Instax Mini cameras on hand, which I recommend. (Did I mention I am a huge fan?) Film is not, however, cheap and I haven’t found it for less than around $0.68 a picture. So though it may be quick, easy and kind of low tech, it’s not in-expensive. The Instax Mini is a fun device, with immediate results and most tweens and teens I know are currently really interested in this device. This is a good starting place if you want easy and immediate results.
Sports Card Pro App
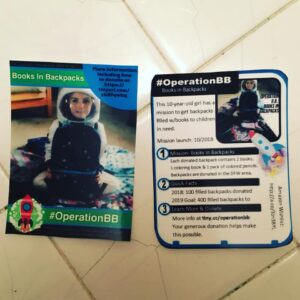
The trading card that you see in the upper right hand card was made using the Sports Card Pro app, which I downloaded for free. It has in app purchases, but the initial app download is free. I made no additional purchases to create my trading card so the entire product was free to me.
Where you see the rocket ship in the left hand corner the Sports Card Pro app gives you a choice of various sports balls to put in that corner. This didn’t really work for me so I saved my picture and opened it in another app, Candy Camera, to add the rocket ship. But if you want a sports theme, you can do it all in this app and pretty quickly. I made the example you see in this picture in about 2 minutes while laying in bed with the TV on in the background and no real experience with the app. I tell you this because I want you to understand how quick and easy it was.
One of the things I liked about this app is how much focus it put on the picture, but that left less room for text. It has rigidly set text boxes and design elements, so it doesn’t allow for a lot of personalization or moving elements around. Some people would like this, but I found it frustrating as I wanted to move certain elements slightly in one direction or another and it just doesn’t give you that freedom of design. You could get around this problem by doing the most basic design in this app, saving your card and then uploading it into another app – like Over or PS Express – to add more design elements, but that’s a lot of additional steps and requires some additional knowledge.
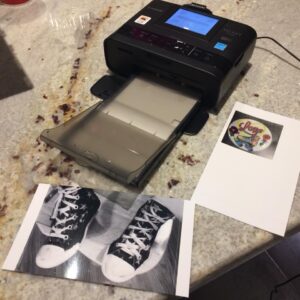
Because this is a mobile device app, you have to be able to print wirelessly to some type of device. Because I knew I wanted a small, trading card size, I used the Print to Size app on my cell phone which allows you better control over sizing as opposed to simply printing from a mobile device to a wireless printer. I printed to both a regular printer and a Selphy photo printer, which I discuss more at the end of this post.
So while this is a good app for designing a sports themed card, it’s not necessarily good for other themes. It was quick and easy, but not very versatile.
Trading Card Creator at ReadThinkWrite
This is a free online program that has an educational focus, so it has a lot more room for text. You can include facts about the book, main characters, setting, etc. After you go through the generator – which is an easy to fill out step by step form – you download your card as a .pdf and it prints on a piece of letter size paper. Adobe is required to run the program.
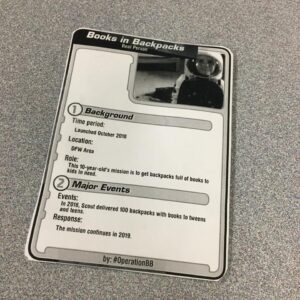
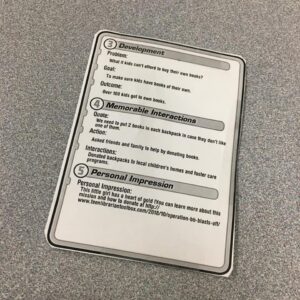
When you print out your page it comes with instructions that tell you to cut it out, fold it, and tape it closed. It prints in color, but I accidentally printed mine in black and white. If you choose the “Make Your Own” option it allows you to put in your own category headings. Otherwise, the big section headings are pre-programmed, which can be a great feature for younger or newer users. However, it does not seem to allow you to move the various elements or text boxes around, so format wise there isn’t a lot of versatility here either. This is a quick and easy tool, but if you want more personalization or versatility, this isn’t the best tool for you. It’s a really great starting place and will work really well in most school or library settings.
Freehand Design Tools: Microsoft Publisher, Google Draw and Canva
I used the format presented in the ReadWriteThink card and a sports trading card I had at home for inspiration to try my final option: Microsoft Publisher, Canva and Google Draw. Each of these programs are publishing programs that allow you the greatest amount of freedom and versatility in how you design and where you place your various trading card elements. You can see the results in the bottom left hand corner of the picture above. Both Canva and Google Draw are basically no or low cost programs that allow you to do freehand design. Microsoft Publisher requires the purchase of a yearly license and it is costly. All three design programs require a certain amount of skill, which most people get just by tinkering around in the programs. I am least well versed in Google Draw and abandoned that medium pretty quickly for something more familiar. I use Publisher and Canva pretty frequently so I was able to produce something I liked pretty quickly and without a lot of difficulty. The final product you see in the picture above was made using Publisher, which I am most comfortable with and, I feel, gives you the most freedom. The Teen and many of the teens I work with, however, are much more familiar with Google Draw and would probably prefer it.
After completing my card design I grouped all my design elements, right clicked on my trading card, saved it as a .jpeg and printed it to size. I was able to print 6 cards per one letter size sheet of card stock paper. Saving it as a .jpeg also allows you to upload it and share it on social media or easily transfer it from one device to another, like from my laptop to my cell phone. There are some real advantages to having a .jpeg file versus a .pdf file.
Printing My Trading Cards
All of the options allow you to save and print your trading card in one fashion or another. If you use a freehand graphics program you can save as a .jpg and print on card stock. You’ll want to use card stock to give it the heft of a trading card. If you have the option, I would print to photo paper to give it that glossy trading card look. Although I liked the look of the curved edges for the trading card design, it requires some additional cutting which was harder to make look nice with my questionable scissor skills. I liked the straight lines because I could use a paper cutter and get nice, straight edges. Your mileage may vary.
If printing from a handheld device I would recommend using the Print to Size app and printing 2 trading cards side by side on one postcard using the Selphy printer and cutting them apart. This was the method of printing I used in the very first picture of this post. Printing with a Selphy printer or onto photo paper using a traditional printer gives you that glossy trading card resembling finish. If you’re not familiar with the Selphy photo printer, it’s a tool I highly recommend for anyone wanting to print photos from a mobile device. It’s small, portable and has its own built in wi-fi so you can take it with you on outreach events and print immediately from a smart phone or tablet. I reviewed the Selphy printer here if you would like more information.
Things to Include on a Book Trading Card
- Title
- Author
- Setting
- A catchphrase or brief descriptive phrase
- Fun facts like characters, themes
- If you like X, read this statements . . .
- A star rating
What to Do with Book Trading Cards?
At it’s most basic, libraries could make book trading cards for our favorite or most recent YA titles and hand them out during book talks or at outreach events. Imagine book talking a book then handing each tween or teen a card with a picture of the book cover and a few basic facts about the book so they could remember to ask for it. Wouldn’t it be great to have teens come into the library after a day of booktalking and just hand staff a book trading card instead of trying to remember details about the book you booktalked that they want and hoping that staff can get enough details to get the right book into their hands?
This would also be a great marketing tool for the library itself or for specific programs. For example, during National Library Week multi-branch systems could make cards for each branch with basic facts about the branch and hand them out to visitors. Libraries could host some type of challenge inviting patrons to visit as many branches as possible during National Library Week and offering an entry into a prize for patrons who get one card from X number of branches.
Beyond using book trading cards as a promotional tool, we could also get tools into the hands of tweens and teens and encourage them to make their own. This activity combines reading/literacy with making, helping us achieve more of our goals. Have a program day where you provide a couple of Instax Mini cameras and some Sharpies and challenge teens to make their own trading cards. Or set up an ongoing station in the corner of your library and make a trading card wall to display teen created book trading cards. Teens could stop in during lunch, study hall or after school and make a quick book trading card and put it on your wall recommending books to their peers.
Learning how to use a good graphics program is a valuable skill for anyone, so don’t be afraid to have some in-depth sessions where you teach teens how to use Publisher, Canva or Google Draw and challenge them to design their own book trading cards. Many schools and libraries have tech training labs and this would be a fun project to teach design basics with some set parameters. I have found that many people want some concrete guidelines and examples to begin learning design with and here we would have a built in template to help guide us.
And don’t forget that if you want an easy to use template, you can have tweens and teens use the ReadWriteThink trading card creator. Print two of each card, one for participants to take home and one to display on an RA wall or book display. Or print 3 – so they can trade!
Some Final Thoughts and Perspectives
Depending on what you need, there are pros and cons to each of the various methods used above. Most school and public libraries are already set up to use something like the ReadWriteThink trading card creator and print. This is probably a really good starting point.
ADVERTISEMENT
ADVERTISEMENT
I highly recommend purchasing a smart phone/tablet and Selphy printer for any teen library space that wants to do a lot of photo based making and programming, but it does require some initial financial investment and the ongoing cost of the specific Selphy paper. You would need multiple devices to have a program, though you can connect multiple devices to one Selphy printer. Or you can set up a small maker station using one device and one printer and allow teens to create as they wanted. Not every teen area or school library has the space or the staff, but if you do a small maker station is a good idea.
And in my ideal world, I would write a grant to get 5 to 10 Instax Mini cameras for a teen space or program to do a wide variety of programming things there. You could also just have one and have teens share or set up a maker station using this method as well.
Don’t forget to create a hashtag so you can encourage tweens and teens to share their book trading cards online.
I made a wide variety of trading cards using all 5 methods over a two-day period. I spent all in all about 3 hours making trading cards. Again, I am a pretty proficient user of both Publisher and Canva so I didn’t have to learn the basics. Each method has its pros and cons and really all of them work pretty well. I liked the Sports Card Pro app the least, mainly because I was not making a sports themed trading card and it required some work around to get rid of the sports themes. As you can see, for my examples I used Thing 2’s Operation BB as a theme for my example cards, mainly because I had those photos readily available on my phone. We did, in fact, print out several of the cards we liked best – the one made in Publisher – and handed them out as a promotional tool and people thought they were very cool. I also uploaded it to the Operation BB social media page. These will, in fact, work really well as fun promotional tools. I had a lot of fun making the trading cards and highly recommend it.
So now it’s your turn. Make a trading card for your favorite book or book character and sharing it with us in the comments or on social media using the hasthag #BookTradingCard. I would love to see what everyone is creating (and reading!)
Filed under: DIY
About Karen Jensen, MLS
Karen Jensen has been a Teen Services Librarian for almost 30 years. She created TLT in 2011 and is the co-editor of The Whole Library Handbook: Teen Services with Heather Booth (ALA Editions, 2014).
ADVERTISEMENT
ADVERTISEMENT
SLJ Blog Network
2024 Books from Pura Belpré Winners
In Memorium: The Great Étienne Delessert Passes Away
Winnie-The-Pooh | Review
Parsing Religion in Public Schools
ADVERTISEMENT

