MakerSpace: Screen Printing with the Silhouette Cameo – a comparison of processes and cost
Making t-shirts have traditionally been some of my most popular programs throughout the years as a YA/Teen Librarian. T-shirts can be immensely cool and we choose them, often, as a form of self expression. Last year we did an entire series on altering t-shirts and it was popular and fun. One of our programs taught teens how to do a low cost form of screen printing on t-shirts. I’ve talked about screen printing before here at TLT, but I wanted to do an in depth analysis of what would work best in a public makerspace, consider process, outcome, and cost.
This past year, we purchased a Silhouette Cameo for our Teen MakerSpace and given this year’s Teen Summer Reading theme – Libraries Rock! – it seemed fitting that we would look once again at screen printing. My goal has been to teach our teens how they can use this type of technology to create their own screen printing designs.
ADVERTISEMENT
ADVERTISEMENT
Today we are going to be looking at screen printing using a silhouette cameo in a couple of different ways, to address various cost issues. One of the factors we will look at is cost, but we have to be honest and admit up front that the technology needed to use a Silhouette Cameo is costly up front. You need a computer or laptop and the Silhouette Cameo itself. Many people have this technology in their homes, but cost is a barrier to access. There are less expensive ways to make stencils, which we have covered before. For example, you can cut stencils out of card stock or old overhead projector sheets.
Traditional screen printing produces screens using an emulsion process. It’s time consuming and requires access to technology and tools that most libraries don’t have, even those with makerspaces. The Silhouette Cameo can be a way to produce screens without going through the traditional emulsion process.
We will be specifically looking at using a pre-made screen and a homemade screen.
Screenprinting is divided into three main activities:
1) Designing your screen
2) Cutting and making your screen
3) And using the screen to screen print onto a t-shirt (the actual screen printing process).
Designing Your Screen
If you are going to be using a Silhouette Cameo to do your screen printing, as we are here, then it comes with it’s own design software. I’m not going to go into detail here how to use the design software. There is a bit of a learning curve and there are a lot of really good online tutorials to help you get started.
When designing specifically for screen printing, I have learned a few rules that help you be successful.
1. Text is difficult, so avoid it if you can.
2. If you do use text, you want to use big and less complicated fonts.
3. Especially when you begin, the less complicated your design the better.
4. You want big, open spaces that are easy to weed, transfer, and ink.
Once you have made a design you are happy with, you will need to cut your vinyl. I do not know how a Silhouette Cameo screen compares to a more traditional emulsion created screen, as I have no experience with that type of screen. I have, however, used stencils, both store bought and hand made, and find the Silhouette Cameo created screen to be superior to other types of stencils. For example, because of the precision of the Silhouette Cameo, I could create a more elaborate design because the Cameo did all the cutting for me; it’s easy and precise. Trying to make smooth cuts onto a stencil by hand is hard, the Cameo elevates the design and precision. Also, using a stencil to paint a t-shirt without the screen is not technically screen printing. That may be splitting hairs, but I like the idea of teaching teens various ways to design and create their own personal shirts.
Cutting and Making Your Screen
To begin, you will send your design to cut like normal.
After your design is finished cutting, don’t remove any vinyl yet! Look at your design and consider what parts of the design you want to be printed onto the shirt. This is the part of the vinyl you will weed. You will be doing a reverse or negative weed. Leave the big piece of vinyl in place with the backing and weed out the design and letters that you want to fill with ink.
You will then have to transfer your sheet of vinyl onto your screen. So let’s talk about screens.
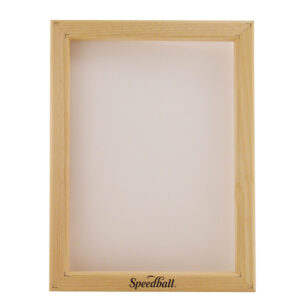
You can purchase a traditional, pre-made screen for screen printing from most craft stores or online. The most common one is made by Speedball. These are wooden frames that have a screen in them, a sort of mesh material. I have seen them priced as high as $25.00. These come in a rectangle shape, they are pre-made so they are pretty taut (this is important to help prevent bleeding), and they are easy to use. They’re ready to go, so you can’t beat that. But buying multiple screens can really begin to add up. The screen in these screen printing frames can be pulled tighter or even replaced.
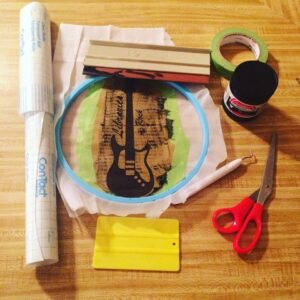
You can also make your own using a mesh curtain and an embroidery hoop for less money. When purchasing a curtain you want a sheer curtain. I bought mine at a local store for only $5.00. Embroidery hoops also cost around $5.00. To create my homemade screen I used permanent vinyl on a piece of sheer curtain. You can take out the entire curtain piece and put a different one in to make a different design. I have made 3 designs and they are just stored for re-use; I literally have a small box that has pieces of curtain with the vinyl attached to them. I just take them out, pop them in an embroidery hoop (making sure to pull it really, really tight) and print another shirt.
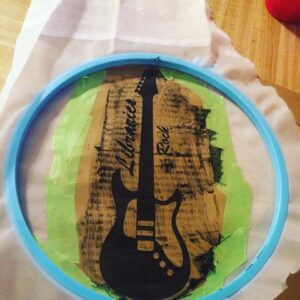
I have tried and used both the Speedball and a homemade screen and, although I found the professional screen to be slightly more effective and easier to use, they both work well.
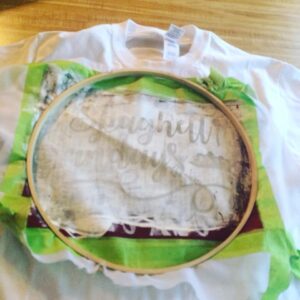
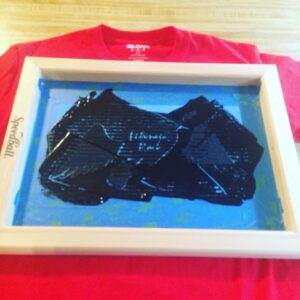
If you have some spare wood lying around, a sheer curtain, and a staple gun, you can also make your own screens this way. You always want to pull your screen as taut as possible. I can not stress how important this is.
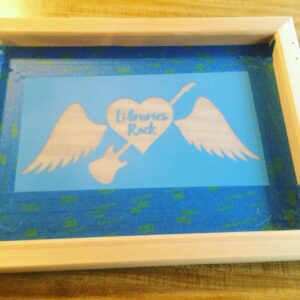
Whichever screen you use, the next step is to transfer your vinyl stencil onto your screen. If you have worked with vinyl before, you’ll know that you use transfer tape (clear contact paper is my preferred transfer tape) and a wedge tool to help you get the backing off of your vinyl and your stencil onto the screen. Be careful to leave all the little bits and pieces in place, like the insides of circles and letters. When screen printing these little bits and pieces can slip or tear away, which is why I recommend as simple a design as possible. You also want to avoid any bubbles or wrinkles and you want to make sure your stencil is firmly applied. You will then want to use painter’s tape to cover up any exposed areas of your screen.

So now you’re screen is made and you need to do the actual screen printing.
Screen Printing Your T-shirt
To do the actual screen printing, you’ll need a paint or ink (fabric paints work, screen printing ink works best but is more expensive), the screen, a wedge or squeegee, and a piece of cardboard to place inside your shirt. First, place your cardboard inside the two layers of your short so your ink doesn’t bleed through to the back layer. You will then put your screen on place on your shirt. Scoop out some of your ink and use the wedge/squeegee to smooth the ink into the empty spaces on your stencil. You’ll then use it to scrape off any excess. Be very careful to fill in every last nook and cranny on your stencil to get a good print.

Carefully remove your screen. I recommend having a blow dryer handy to do a little bit of drying before moving or touching your shirt. Then let it dry completely. Follow the instructions for washing your shirts afterwards.

ADVERTISEMENT
ADVERTISEMENT
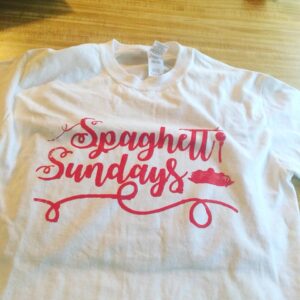
So in the shirt above, I actually had both a success and a failure. When doing the Spaghetti Sundays shirt above, the words were the negative space and that worked really well. However, in this design, the words Libraries Rock were on the screen and were meant to prevent the ink from going into that space and leave the shirt exposed, displaying the words. That didn’t work, the letters moved and there was bleeding. So I covered it all up with black and that worked fine. I then used vinyl cut outs on heat transfer to put my wording in place. I’m still trying to figure out how to be more successful with lettering.
In all honesty, the pre-made screen is easier to make and use. It’s already taut, so you don’t have to worry about pulling it tight enough in your embroidery hoop. I also found the rectangle shape easier to work with, which may just be a personal preference. I had more bleeding with the embroidery hoop, though I admit that can be user error. Because I had a great discount coupon, the pre-made screen wasn’t really any more expensive than making my own.
So deciding which screen to use is a draw. Because you can make more than one screen with a curtain, I think it would work better in a public makerspace with multiple people making and using screens. Making your own screens is cheaper when you need multiple screens.
For my personal use, I much prefer the Speedball screens. However, for the Teen MakerSpace, home made screens seem the better way to go. Ultimately, they are less expensive so you can produce multiple screens for the same amount of money, which is important when you are going to have to produce multiple screens in a single program.
Supplies:
- Laptop/Computer
- Silhouette Cameo
- Vinyl
- Scissors
- Various vinyl tools, including the weeding tool
- Painters tape
- Screen printing screen (premade or homemade using a mesh curtain or embroidery hoop)
- Screen printing ink
- Wedge/squeegee
- Table covering
- Clear contact paper
- T-shirt
Please note, you can also screen print things like posters and such, it doesn’t have to be done solely on material.
Some good tutorials
Silhouette Screenprinting Tutorial (for beginners) – YouTube
How to Screen Print Using Vinyl: Silhouette Tutorial – Silhouette School
Previously on TLT
MakerSpace: 5 Ways We Transformed T-Shirts into Something New
Low Tech, Low Cost “Screenprinting”
MakerSpace: Using a Silhouette Cameo to Do Screenprinting
Filed under: Makerspace
About Karen Jensen, MLS
Karen Jensen has been a Teen Services Librarian for almost 30 years. She created TLT in 2011 and is the co-editor of The Whole Library Handbook: Teen Services with Heather Booth (ALA Editions, 2014).
ADVERTISEMENT
ADVERTISEMENT
SLJ Blog Network
One Star Review, Guess Who? (#202)
This Q&A is Going Exactly As Planned: A Talk with Tao Nyeu About Her Latest Book
More Geronimo Stilton Graphic Novels Coming from Papercutz | News
Parsing Religion in Public Schools
ADVERTISEMENT


