What I Learned from the Cincinnati MakerSpace, part 2: Maker Mondays
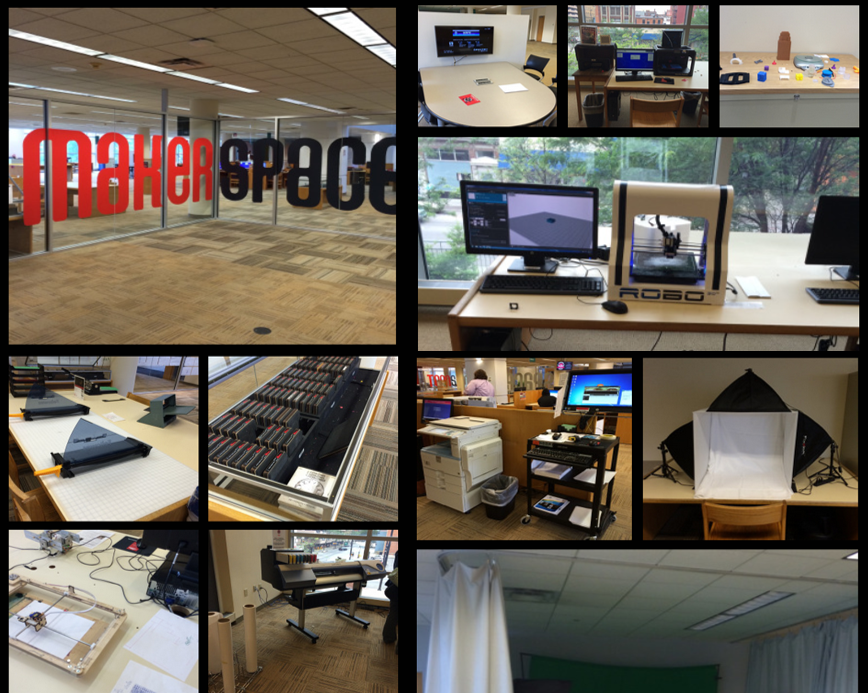
Last week, I mentioned that I visited the Cincinnati Public Library to see its fantastic MakerSpace. It is a large, open space located on the second floor that houses an impressive number of various maker tools, including a green screen, a recording booth, a 3D printer and more. They also have some low tech maker tools like button makers. And they make all of their Ellison/Accucut dies available to the public. It looks something like this:
My colleague who visited with me noted that they had done a lot of things right. For one, they re-used a lot of older furniture in the space which gave it a studio feel; you felt more like you could were really free to work in the space and weren’t worried about ruining new furniture. The money undoubtedly went into all the equipment that they had.
ADVERTISEMENT
ADVERTISEMENT
I thought they included a good mix of high and low tech opportunities. And they had examples on display to show you what had been done, which was very inspiring.
So we went back to The Public Library of Mount Vernon and Knox County, also in Ohio, and wondered how we could make some version of what we had seen work for us. Our first stumbling block was the fact that we did not and would not any time soon have floor space to dedicate to an ongoing MakerSpace. PLMVKC is a smaller library and we just don’t have the floor space to spare.
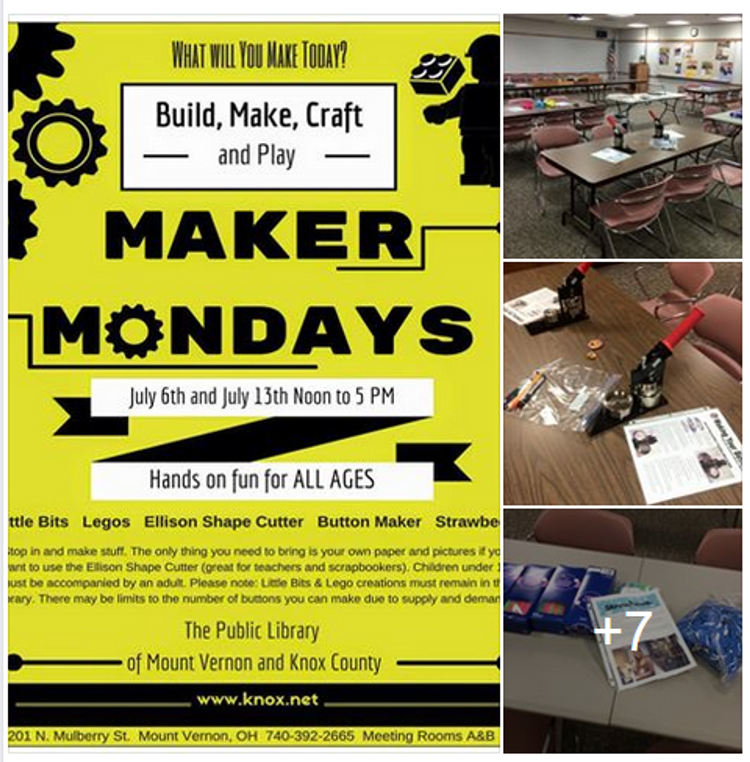
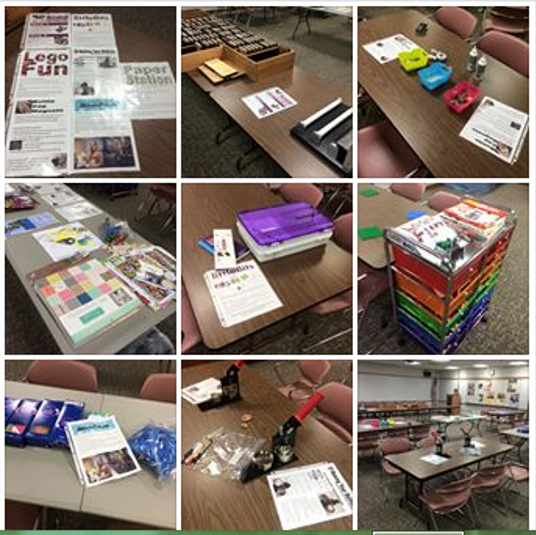
So while we don’t have a permanent space to dedicate, we do have a sizable program room that we can turn into a MakerSpace on various dates. The need to be able to set it up and tear it down for a one day event means that, for the time being, we can’t invest in some of the bigger tech. But we are doing a first trial run today as you read this. We’ve worked really hard on providing a variety of options and setting them up in ways that makes set up and tear down easy to accomplish.
As you can see, our Maker Mondays is loosely based on the concepts inspired by the Cincinnati Public Library’s MakerSpace. We had already purchased the Little Bits and Legos. The Ellison and Accucut dies were also something we had on hand (and taking them from the top floor to the basement for our Maker Mondays only took 3 trips). Inpsired by CPL, we did purchase a couple of American Button Machines, which I blogged about here. Our goal is to eventually add in a few additional items so that we can rotates some of the various features.
So here’s some of what we learned in researching and setting up our first Maker Monday:
1. Signage and instructions are key
We wanted to make sure that patrons new how to use the various tools available to them in the space. Whenever possible we combined step by step pictures as well as verbal instructions. We also put on each instruction sheet a reminder that they could post pictures of their creations and tag the library on various social media channels.
We decided to put the instructions in clear sheet protectors so that they could easily be gathered up at the end of the day and put into a 3-ring binder, ready to go for the next time. There will be multiple sheets inside.
2. You’ll need a minimum of 2 staff members
Because I was setting up over the 4th of July weekend, I did a lot of the set up by myself. It made the process take a little bit longer. In addition, some of the tools we are providing access to may require some initial training for patrons. Our Maker Monday will be open for 5 hours for the first two weeks so that we can better evaluate how it all works, what we’ll need, etc. But the one thing we know for sure is that it looks like a minimum of two staff members would be ideal.
3. Goal: A variety of staff trained and excited about the Maker Mondays
Because the point of making is to encourage discovery, exploration and creativity, this isn’t really a program that needs to relegated to any one staff member or department. In fact, our Maker Mondays are open to all ages with the caveat that children 10 and under will need adult assistance. Ideally, we will train a pool of staff to run each station and how to do set up and tear down. This will help spread the wealth and sense of fulfillment and participation among staff while eliminating the stress on a single staff member or department.
4. Organize, organize, organize and organize again
ADVERTISEMENT
ADVERTISEMENT
As we set up the various stations, we realized that we needed some better organizational tools. For the Legos, we bought a rolling cart that makes it easy to store and move the pieces. Little Bits offers its own storage units right there on its own home page for purchase and we availed ourself of those. In addition, we bought simple table top bins that we could label the various button components, etc. Better organization – and we recommend storage bins with lids and handles – makes it easier for storage, transportation, set up and tear down.
5. Be open to evaluating and making changes
We did a trial run as part of our teen SRC programming and took notes. That’s how we discovered that we needed more plastic organization bins and better mobility. We fully intend that as we repeat our processes we will continue to refine them.
I completely understand the appeal of having a MakerSpace installation, especially as you incorporate bigger and more advanced tech. But with a little planning, organization and elbow grease, it is very reasonable to create an easily set up and torn down Maker Space that can be stored in between sessions. This allows the library to make a better use of its space while still providing Maker based opportunities for their community.
MakerSpace Notes:
My Original Mobile Makerspace (the text below)
My Updated Mobile Makerspace
MakerSpace Tech Tools Comparison Chart
The Unboxing and Learning Curve
Exploring Circulating Maker Kits and Circulating Maker Kits part 2 with a Book List
The Maker Bookshelf/Collection (with a book list)
Strawbees part 1 and part 2
Things I Learned Visiting the Cincinnati MakerSpace: Fun with Buttons! Edition
Creating and Using an iPad Lab in Your Library
Take 5: 5 Tools for Movie Making in Your MakerSpace
Take 5: The Robot Test Kitchen Reading List
Filed under: Makerspace
About Karen Jensen, MLS
Karen Jensen has been a Teen Services Librarian for almost 30 years. She created TLT in 2011 and is the co-editor of The Whole Library Handbook: Teen Services with Heather Booth (ALA Editions, 2014).
ADVERTISEMENT
ADVERTISEMENT
SLJ Blog Network
Name That LEGO Book Cover! (#53)
Cover Reveal and Q&A: The One and Only Googoosh with Azadeh Westergaard
K is in Trouble | Review
Fighting Public School Book Bans with the Civil Rights Act
ADVERTISEMENT


