TPiB: Touch Screen Gloves from the Robot Test Kitchen
There’s no need to spend big bucks on fancy gloves that let you use your touchscreen devices. In this inexpensive and simple program teens can make their own! This is also a great STEM related program for those of us who are more comfortable with traditional craft programs. It’s timely given the winter season fast approaching, and teens will end up with a really useful product that they can either keep and use themselves, or give as a gift.
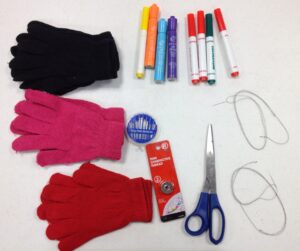
Materials:
$1 / 2 pairs Gloves
Needles & Needle threader
Fat markers
There are no real big expenses here as you can likely find some needles around the library or your own house. The bobbin spool of conductive thread linked above contains 26 yards, ample even for a large group. Teens can bring their own gloves from home, or you can easily find them this time of year at a Dollar Store.
ADVERTISEMENT
ADVERTISEMENT
Process:
Thread the needles with a couple feet of conductive thread.
Have teens select and put on the gloves, then pretend that they are using a handheld device. This is to figure out exactly where they want the conductive bits to be (hint: it’s not square in the center of your thumb!). Use the marker to mark the spots.
 Remove the gloves and insert a capped marker into the first finger that you’re going to sew. This is so you can use your dominant hand to sew and still avoid sewing the fingertip closed!
With a simple satin stitch, create the conductive pad.
It’s important to get the stitches to go all the way through the layer of glove material. If the conductive thread doesn’t contact your finger, it won’t work.
Test out each pad after you finish stitching, but before you knot it off. If it doesn’t work as well as you want, add more rows of stitching in the correct places, being sure to go all the way through the fabric of the glove so that it contacts your hand.
After knotting off the work, leave a tail of thread inside the finger of the glove to ensure that there’s plenty of contact between your hand and the conductive pad.
If visuals help, this great video explains it all.
If you do self-directed programs at your library, this would be an easy enough activity to set out as a take-home with a few additional prep steps:
- Cut lengths of the thread and wind them around cards – ideally instruction cards for this activity.
- Consider pre-threading needles with the thread.
-Heather
Filed under: Crafts, Makerspace, STEAM education, Teen Programming, TPIB
About Heather Booth
Heather Booth has worked in libraries since 2001 and am the author of Serving Teens Through Reader’s Advisory (ALA Editions, 2007) and the editor of The Whole Library Handbook: Teen Servcies along with Karen Jensen.
ADVERTISEMENT
ADVERTISEMENT
SLJ Blog Network
One Star Review, Guess Who? (#202)
This Q&A is Going Exactly As Planned: A Talk with Tao Nyeu About Her Latest Book
Exclusive: Giant Magical Otters Invade New Hex Vet Graphic Novel | News
Parsing Religion in Public Schools
ADVERTISEMENT







This is just the idea I was looking for! I want to do a winter craft for teens in our Makerspace next month, and this one’s perfect! Thanks!
Thanks for sharing this idea! This is such a cheap and easy program to do as the weather gets colder. This would also be a great way to introduce more complex wearable electronics to see if there is interest.
Hello there I am so glad I found your blog, I really found you by mistake, while I was
searching on Digg for something else, Nonetheless
I am here now and would just like to say thanks for a remarkable post and a all round enjoyable blog (I also love the theme/design), I don’t have
time to go through it all at the minute
but I have bookmarked it and also included your RSS feeds, so when I have time I will be back to read more, Please do keep up the great
b.